Welcome to the Dashboard Manual. This user manual is intended to provide you with detailed information and background on how to use the dashboard in Sim4Life.web.
The full-featured Sim4Life.web platform can be accessed in one of two ways:
sim4life.io – Intended for businesses. Functions on a pay-per-use model.
sim4life.science – Intended for academic research groups. Functions on a pay-per-use model, with a significant academic discount.
A full comparison of the different versions of Sim4Life can be found on our website at sim4life.swiss/specifications.
Under the TUTORIALS dashboard tab, you will find a set of pre-built read-only tutorial projects with results and scripts that illustrate how Sim4Life.web can be used to solve various simulation problems.
For more specific technical information, please refer to the Sim4Life.web manual.
Originally created and derived by 0xRajeev, founder of Secureum, former Trail of Bits engineer and PhD holder.
This repo details Saltzer and Schroeder’s 10 secure design principles as applied to solidity smart contracts. It is the first part of piece of the puzzle that is my implementation of DevSecOps as applied to smart contracts.
The following design principles should be adhered to by blockchain developers intending to write secure code from the ground up and attain maximum value out of external smart contract audits. This list should be supplemented by the Solcurity standard by Rari-Capital and the Solidity DevSecOps standard
Principle of Least Privilege: “Every program and every user of the system should operate using the least set of privileges necessary to complete the job” — Ensure that various system actors have the least amount of privilege granted as required by their roles to execute their specified tasks. Granting excess privilege is prone to misuse/abuse when trusted actors misbehave or their access is hijacked by malicious entities. (See Saltzer and Schroeder’s Secure Design Principles)
Principle of Separation of Privilege: “Where feasible, a protection mechanism that requires two keys to unlock it is more robust and flexible than one that allows access to the presenter of only a single key” — Ensure that critical privileges are separated across multiple actors so that there are no single points of failure/abuse. A good example of this is to require a multisig address (not EOA) for privileged actors (e.g. owner, admin, governor, deployer) who control key contract functionality such as pause/unpause/shutdown, emergency fund drain, upgradeability, allow/deny list and critical parameters. The multisig address should be composed of entities that are different and mutually distrusting/verifying. (See Saltzer and Schroeder’s Secure Design Principles)
Principle of Least Common Mechanism: “Minimize the amount of mechanism common to more than one user and depended on by all users” — Ensure that only the least number of security-critical modules/paths as required are shared amongst the different actors/code so that impact from any vulnerability/compromise in shared components is limited and contained to the smallest possible subset. (See Saltzer and Schroeder’s Secure Design Principles)
Principle of Fail-safe Defaults: “Base access decisions on permission rather than exclusion” — Ensure that variables or permissions are initialized to fail-safe default values which can be made more inclusive later instead of opening up the system to everyone including untrusted actors. (See Saltzer and Schroeder’s Secure Design Principles)
Principle of Complete Mediation: “Every access to every object must be checked for authority.” — Ensure that any required access control is enforced along all access paths to the object or function being protected.
Principle of Economy of Mechanism: “Keep the design as simple and small as possible” — Ensure that contracts and functions are not overly complex or large so as to reduce readability or maintainability. Complexity typically leads to insecurity.
Principle of Open Design: “The design should not be secret” — Smart contracts are expected to be open-sourced and accessible to everyone. Security by obscurity of code or underlying algorithms is not an option. Security should be derived from the strength of the design and implementation under the assumption that (byzantine) attackers will study their details and try to exploit them in arbitrary ways.
Principle of Psychological Acceptability: “It is essential that the human interface be designed for ease of use, so that users routinely and automatically apply the protection mechanisms correctly” — Ensure that security aspects of smart contract interfaces and system designs/flows are user-friendly and intuitive so that users can interact with minimal risk.
Principle of Work Factor: “Compare the cost of circumventing the mechanism with the resources of a potential attacker” — Given the magnitude of value managed by smart contracts, it is safe to assume that byzantine attackers will risk the greatest amounts of intellectual/financial/social capital possible to subvert such systems. Therefore, the mitigation mechanisms must factor in the highest levels of risk.
Principle of Compromise Recording: “Mechanisms that reliably record that a compromise of information has occurred can be used in place of more elaborate mechanisms that completely prevent loss” — Ensure that smart contracts and their accompanying operational infrastructure can be monitored/analyzed at all times (development/deployment/runtime) for minimizing loss from any compromise due to vulnerabilities/exploits. For e.g., critical operations in contracts should necessarily emit events to facilitate monitoring at runtime.
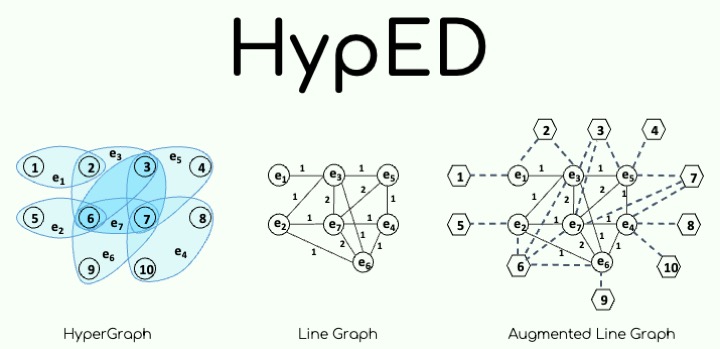
This package includes an algorithm to answer point-to-point s-distance queries in hypergraphs, approximately.
The algorithm can answer three types of queries: vertex-to-hyperedge, vertex-to-vertex, and hyperedge-to-hyperedge.
This is achieved by constructing a distance oracle, which can be stored on disk for future usages. The distance oracle stores distances from landmark hyperedges to reachable hyperedges, so that the distance between two hyperedges can be approximated via triangle inequalities.
The algorithm requires in input an integer L used to compute the desired oracle size O = L x |E|, where |E| is the number of hyperedges in the hypergraph. Please note that L is not the actual number of landmarks selected by the distance oracle.
The package includes a Jupyter Notebook (Results.ipynb) with the results of the experimental evaluation of HypED, and the source code (related) of the two competitors considered in the evaluation.
To check the results of our experimental evaluation:
Jupyter Notebook
Input Format
The input file must be a space separated list of integers, where each integer represents a vertex and each line represents a hyperedge in the hypergraph.
The algorithm assumes that the file does not contain duplicate hyperedges.
The script run.sh assumes that the file extension is .hg.
The folder datasets includes all the datasets used in our experimental evaluation.
Usage
You can use HypED either by running the script run.sh included in this package, or by running the following command:
The command creates a distance oracle for the input hypergraph (if it has not been created yet with the same parameter combination), and evaluates the performance of HypED on a set of numQueries random queries.
For each query, it finds the approximate distance profile including the s-distances up to maxS.
To evaluate the performance of the algorithm on a specific set of queries, such queries must be stored in a space-separated file, given in input with the option queryFile=<file_name>.
The code assumes that the query file is located in the same folder where the graph file is located.
To evaluate the performance of the algorithm when answering a specific set of s-distance queries for given values of s, such queries must be stored in a space-separated file, and then, the following command must be executed:
Even though the query file includes the s values for which we want to compute the s-distances, we need to provide maxS in input, as its value is needed for the construction of the oracle.
Using the Script
The value of each parameter used by HypED must be set in the configuration file config.cfg:
General Settings
input_data: path to the folder containing the graph file.
output_data: path to the folder to store the results.
landmarkSelection: how to select the landmarks within the s-connected components (random, degree, farthest, bestcover, between).
landmarkAssignment: how to assign landmarks to s-connected components (ranking, prob). If prob is selected, each experiment is performed 5 times using different seeds.
alpha: importance factor of the s-connected component sizes.
beta: importance factor of the min overlap size s.
seed: seed for reproducibility.
kind: type of distance query to answer (vertex for vertex-to-vertex, edge for hyperedge-to-hyperedge, both for vertex-to-hyperedge).
isApproximate: whether we want to compute only the approximate distances, or also the exact distances.
Dataset-related Settings
Dataset names: names of the files (without file extension).
Default values: comma-separated list of default values for each dataset, i.e., value of L, percentage of hyperedges to sample, number of queries, lower bound lb for a s-connected component size to be considered for landmark assignment, max min overlap s, whether the oracle should be saved on disk.
Num Landmarks: comma-separated list of L values to test.
Experimental flags: test to perform among (1) compare strategies to find the s-connected components, (2) compare HypED with two baselines, (3) compare the performance using different importance factors, (4) compare the landmark selection strategies, (5) create distance profiles for random queries, (6) create distance profiles for given queries, (7) answer s-distance queries for given queries, (8) find the s-line graphs of the hypergraph up to maxS.
Then, the arrays that store the names, the number of L values, and the experimental flags of each dataset to test must be declared at the beginning of the script run.sh.
Output Format
The algorithm produces two output files: one contains the approximate distances, and the other one some statistics.
Output File: comma-separated list including src_id, dst_id, s, real s-distance (only if isApproximate was set to False), lower-bound to the s-distance, upper-bound to the s-distance, and approximate s-distance (computed as the median between lower and upper bound).
Statistics File: tab-separated list including dataset name, timestamp, oracle creation time, query time, max min overlap s, lower bound lb, value L, number of landmarks selected, number of distance pairs stored in the oracle, number of distance profiles created, landmark selection strategy, landmark assignment strategy, alpha, and beta.
Related Code
The folder related includes the source code of the two competitors considered in our experimental evaluation.
CTL[1] (folder CoreTreeLabelling) improves the state-of-the-art 2-hop pruned landmark labeling approach, by first decomposing the input graph in a large core and a forest of smaller trees, and then constructing two different indices on the core-tree structure previously generated.
Distance queries can be answered exactly as the min between the distances provided by the two indices.
HL [2] (folder highway_labelling-master) is a landmark-based algorithm that first selects a set of l vertices, and then populates two indices: the highway and the distance index.
The distance index is populated starting BFSs from the l vertices, and is guaranteed to be minimal given that set of vertices.
At query time, the algorithm first finds an upper-bound to the distance exploiting the highway index, and then, finds the distance in a sparsified version of the original graph.
Both approaches are designed for connected graphs, and hence do not guarantee to provide exact answers when the graph is disconnected.
We used them to construct indices for the s-line graphs of the hypergraphs.
Usage
Both approaches assume that the node ids take values in [0, |V|], where |V| is the total number of vertices in the graph.
If you need to remap the vertices (and hence the query files), you can use the Python script graph_query_remapping.py.
The script includes some comments on its usage.
The meta-structures used by the algorithms can be created using the bash script preprocessing.sh.
This script includes some variables that must be properly set:
file_path: path to the graph files
datasets: space-separated list of graph names
proj: space separated list of s values, where each value gives the name of the s-line graph
other parameters: CTL requires a list of tree-width values (tws), while HL requires a list of numbers of vertices (lands)
The queries can be answered using the bash script query.sh.
This script includes some comments on its usage.
For further information, please refer to the ReadMe files included in the folders, or to the original repositories [3, 4].
License
This package is free for use (GNU General Public License).
References
[1] Wentao Li, Miao Qiao, Lu Qin, Ying Zhang, Lijun Chang, and Xuemin Lin. 2020. Scaling up distance labeling on graphs with core-periphery properties. In SIGMOD. 1367–1381.
[2] Muhammad Farhan, Qing Wang, Yu Lin, and Brendan Mckay. 2019. A highly scalable labelling approach for exact distance queries in complex networks. In EDBT.
smooks/smooks – An extensible Java framework for building XML and non-XML (CSV, EDI, Java, etc…) streaming applications
walmartlabs/gozer – The EDI X12 Standard provides a uniform way for companies to exchange information across different sectors.
xlate/staedi – General X12/EDIFACT stream reader and writer with support for validation of standards with optional schema customizations (i.e. implementation guides)
C#/DotNet
olmelabs/EdiEngine – Simple .NET EDI Reader, Writer and Validator. Read, Write and Validate X12 EDI files with simple EDI Parser written on C#.
indice-co/EDI.Net – EDI Serializer/Deserializer. Supports EDIFact, X12 and TRADACOMS formats
tdecaluwe/node-edifact – (Javascript) Javascript stream parser for UN/EDIFACT documents.
parcelLab/edi-iftmin – Parsing EDI IFTMIN and IFTSTA messages properly. Yes, EDI. You’re welcome.
tastypackets/x12-parser – X12 parser implemented using the NodeJS Transform API. Tested with over 1M 835 records, but is designed to work with all modern X12 records.
aaronhuggins/node-x12 – ASC X12 parser, generator, query engine, and mapper; now with support for streams.
Ruby
ConsultingMD/ediot – (Ruby) Electronic Data Interexchange Open Transformer (transforms EDI-834 into CSV)
irobayna/stupidedi – Ruby API for parsing and generating ASC X12 EDI transactions.
sezna/edi – Rust crate for parsing X12 EDI and acting on it. Supports serialization to a variety of formats including JSON.
Golang
jf-tech/omniparser – omniparser is a native Golang ETL parser that ingests input data of various
formats (CSV, txt, fixed length/width, XML, EDI/X12/EDIFACT, JSON, and custom formats) in streaming fashion and transforms data into desired
JSON output based on a schema written in JSON. See EDI and EDI readers for more usage details.
BerryWorksSoftware/edireader – EDIReader is a Java package for parsing business documents structured according to EDI standards. It supports the SAX and JAXP interfaces defined for XML, making it suitable for use in any XML-based system that allows the configuration of a custom SAX parser.
EDIdEv – The EDIdEv Framework EDI (FREDI) solution is comprised of an EDI tool and a customizable EDI application.
Odoo – Odoo. Open Source Apps To Grow Your Business.
Edipique/EDI-X12 – Rough process for generating EDI X12 834 and 837 files from a CSV file. Structured in a way that allows easy transition to other data sources.
EDI Bootstrap (Stedi) – open-source, end-to-end system to generate and parse X12 EDI from a JSON
Public EDI References
X12 Reference – Free online viewer for all releases of X12 specifications.
EDI Guide Catalog – An open directory of the most-requested Stedi Guides, interactive EDI specifications that let you instantly validate EDI documents.
EDIFACT Reference – Free online viewer for all releases of EDIFACT specifications.
If you want to adapt this software make sure to have your development environment set up like described in the DeepaMehta Plugin Development Guide.
To install and setup hot-deployment for this plugin when having just downloaded and unzipped deepamehta, you could, for example configure your deepamehta bundle directory in the pom.xml of this plugin. Therefore add a dm4.deploy.dir path as a property to the pom.xml in this directory. For example:
To build dm4-kiezatlas-website successfully you’ll need to build or install its dependencies into your local maven repository. This is due to the fact that we did not have the time to publish these bundles on maven central.
Now you can build and hot-deploy the sources of the dm4-kiezatlas-website plugin using the following two commands:
grunt
mvn clean package
Grunt here is used to concat and minify some of the javascript sources as well as our custom selection of semantic-ui css components. Maven compiles the java sources and builds the plugin as an OSGi bundle.
License
Thise source code is licensed under the GNU GPL 3.0. It comes with no warranty.
Version History
0.6 — 04 May, 2017
Installed migration11, imported Bezirksregion-LOR CSV topics as LOR Utilities and Installed migration13
Introduced csv bezirksregion / lor mapping (csv-import)
0.5 — Winter, 2016
More robust geo object entry form
Interface to serve simple, custom made Citymaps
City and district wide fulltext search on geo objects
Confirmation workflow for new geo objects created by the public
The goal of the project was to create a chat room that updates in real-time and is capable of saving messages to a database to be displayed whenever the chat was opened in the future. The project initially targeted deployment in a custom infrastructure with automated bots to use the chat. Some of these goals were out of reach, and will be outlined in the “Future Work” section.
Literature Review of Similar Projects
The first project referenced in our own project was the “Real-time chat” from serverjs.io [1]. This project was the inspiration behind our original project; it utilized a chat embedded into a div form that used websockets as the primary form of communication between clients connected to the server. Natively, it uses nodejs, a Javascript server utility that we ended up sticking with. Additionally, this project gave us the idea of using cookies to track users and give the user a more “stateful” experience in the chatroom. We expanded on the cookie system with a more robust login system. The guide was a complete tutorial of how to start a simple messaging system which became a sort of template.
The next system that was referenced was from a SkySilk.com blog [2] which contained much the same information for socket-based communication. While we ended up creating our own system for checking for new messages, we did use one line of code from the project for chat control; it simply scrolls the chat’s window down to the most recent message in the event of a new one being sent. Similar to the previous reference, this guide mirrored the use of node.js and added in the recommendation of express.js. This was not implemented.
As for the Website-PHP-InfluxDB interactivity, it cannot be underestimated how important the technique of AJAX was for this application. AJAX stands for “asynchronous javascript and XML” and it is a technique that allows one to send POST requests to a PHP web server without reloading the page. For obvious reasons, this is desirable and can even be considered mission critical for a live chat application. The informative port by Capra, R [3] provides detailed information on how AJAX requests work using JQuery and using that as an example to work on, the code for posting and receiving data to and from the PHP server was developed.
The interaction between PHP and InfluxDB was conducted through the use of the InfluxDB-PHP library. As such, the GitHub repository containing the code for this library [4] was consulted frequently for installation instructions as well as for examples. The full details of the installation are listed in the section below.
The HTML for the chat is simple; a table as a container for an image and for the chat controls and viewing window. The chat input itself is wrapped in form tags which makes a call to send the message to the database (InfluxDB).
The project utilizes internal Javascript to power the chats. See the images below.
The internal Javascript of the same file (index.html) contains a $(document).ready function which initializes the message uploader. On submission of the form, if the string is empty, the user is notified with an alert. The author of the message is pulled from the cookie which it’s set in, and a timestamp is also taken for use in updating the chat in the future. The message is sent with a $.post() command, which thoroughly checks for errors on completion.
Image 7: On form submission; send to InfluxDB
Next is the login system; when the document is starting up, it checks the user’s cookies for a “current_user”. This is important to the chat box because this username gets shown with all chat messages. If this is not set, a user is prompted to create a username. If the username does not already exist in the database, the user is prompted to register with a password. If it does exist, the user is asked to log in. If the password does not match up, the user is kicked out to the beginning of the whole process.
Image 8: Part ½, Javascript Login System
Image 9: Part 2/2, Javascript Login System
Next is the scraper for updating the chat. As mentioned in the literature review, we decided to avoid the sockets and implement our own updater. This would give us more knowledge on the system and put us in a better position to update it however we want to in the future. The next image shows this scraper’s functionality; a “latestTime” variable is set and referenced within an interval loop set to half a second. It sends this latest time checked to the server and queries for any messages that might have been submitted after that time. This ensures that all messages are collected in a timely manner. Any missed messages are returned with a bar character “|” as a separator, which is then deconstructed into the individual messages. Lastly, the “latestTime” variable is updated and the loop repeats.
Image 10: Chat Updater/Influx Scraper
Last of all for the Javascript is the message constructor that is called in the chat updater. This section of code extracts information from the JSON retrieved from the database. It pulls the message sent time, the author, and of course, the message itself. We’ve also implemented chat notification sounds in the form of cat meows, which is the theme of the chat.
Images 11 & 12: Message Constructor
PHP:
The PHP document, found at ~/php_server/index.php, pulls important environment variables from the system when a request is made, connects to the appropriate database using these environment variables, runs database-interactive code, and finally returns the requested data. The first image is a function of a message being sent to the database:
Image 13: PHP to Influx Code – Pushing a Message to Influx
The next image shows how the PHP code handles a chat update request. All chats are queried past the given “latestTime” variable that originated in the Javascript provided previously. If messages are encountered, they are combined with the bar character “|” and sent back to the Javascript for message processing:
Image 14: PHP – Receiving new messages from Influx
Next is the login system; it simply then connects to the login table, ensures that all of the necessary information is present, and loads the information into InfluxDB.
Image 14: Registering a new user
Last of all, we have a small block of code which simply logs into a new user. It checks that a username and password was sent and if so, compares the given password to the one in the database:
Image 15: Log into an existing user
Influx:
Schema, Table, Interactions – (Design choices/examples of each)
The reasoning behind this schema design is due to the way that InfluxDB holds data. All data to be written to InfluxDB requires a measurement name, fields, tags, and a timestamp. The measurement name in this case corresponds to “message”. Although the fields are usually used for numerical values, we decided to include the length of the string (for any future applications) as well as the actual string itself (denoted as value). The tags usually include metadata about the measurement, which is why we included the “from” address, the “to” address, and the message itself in the tags. Finally, the timestamp is a Unix timestamp corresponding to the number of seconds since January 1, 1970 UTC. This timestamp is marked as when the message was processed in the PHP server.
This measurement schema corresponds to the usernames and associated passwords stored in InfluxDB. As can be seen here, the only field corresponds to the value of the username itself. The tags include the username and the password of the user. Finally, the timestamp marks when the PHP server processed this user and thus can also serve as a marker for when the username was created.
Functionality/Example: (full diagram attached in .zip file)
Example:
Logging in for the first time
Entering a username
Entering one’s password
(password visible for debugging purposes)
Password attempt successful
Example of getting the password wrong:
Example of registering a new user
Typing messages
Message can now be seen.
Examples of different perspectives depending on who the user is (one is signed in from Chromium, and the other from Firefox):
“Sign Out” button is available for erasing the “user” cookie and logging out.
Additional “Click to Meow” button that plays a meow sound every time a new message (not by a user) is submitted.
Run the PHP server inside of the php-server directory
cd php-server

sudo php -S localhost:8080
Future Work
Our future intentions are to create a simple video streaming service with this live chat sat beside it. The video would replace the gif of the cat, and the login system would be made to be more robust, with encryption and the proper security protocols in place. We would also like to replace our updating system with a socket-based system.
David and I are research assistants and have spent the better part of the year building a cloud agnostic server infrastructure. It was our intention of hosting this system on that architecture to make the system not only scalable, but templateable. This would mean that new chats could pop up in response to system demand. This was not implemented simply because of time constraints, however, this would be as simple as containerizing our existing code and hosting it in the infrastructure in the near future.
Team Member Contributions:
Benjamin Luchterhand (Team Leader, ~45%):
Original project concept with working Javascript chat
Install environment such as Google Colab env, GPU with high RAM. Google Colab is an online environment for machine learning and deep learning, which supports Python and Jupyter Notebook. The free version has only basic functionality. For reproduction, I use the Pro version with a high RAM GPU (monthly costs $10.88).
Download and unzip Models and Data at Release, as well as the source code.
Upload the whole funcom_reproduction folder to the Google Drive root (everyone has 15GB free storage, I think maybe enough). Create a directory and make sure that the data folder is located at ./funcom_reproduction/scratch/funcom/data.
Usage
Before the model training, Please create outdir directory under ./funcom_reproduction/scratch/funcom/data, and then create 3 directories histories, models and predictions respectively under outdir. After creation, you can execute steps 0, 0.5, 1 and 2 in the .ipynb file for training. The epoch suggested by the author is 5 (each epoch nearly costs more than 2 hours) because the effect will decrease if the epoch>5. But in my case, ast-attendgru model will abort exceptionally at the 4th epoch so eventually I choose epoch=3 for comparison. The epoch value can be modified at line 79 of train.py. Or you can also use my models in Models and skip this step.
For comment generation and BLEU score calculation in the standard dataset, the attendgru model and ast-attendgru model have been released in Models. You can directly use them to generate comments for calculating BLEU scores. If you do, please start from step iii the following:
Select outdir_attendgru or outdir_ast-attendgru in data, and rename the folder as outdir.
Put the corresponding model file from Models under the directory ./funcom_reproduction/scratch/funcom/data/outdir/models. For example, if you choose outdir_attendgru, you need to use attendgru_E03_1633627453.h5 or attendgru_E05_1633627453.h5. Please do not forget to create the models directory.
Open the corresponding .ipynb file under the root directory, and execute steps 0, 0.5, 1 and 3. After that, the .txt comment will be generated under ./funcom_reproduction/scratch/funcom/data/outdir/predictions. Please double-check the .h5 file name before running the code.
Calculate the BLEU score by executing step 4 in the .ipynb file. I leave my results here for checking:
Model
Ba
B1
B2
B3
B4
ast-attendgru, E03
19.37
38.74
21.88
14.75
11.27
attendgru, E03
19.24
38.65
21.77
14.66
11.12
attendgru, E05
19.14
37.88
21.4
14.66
11.3
For comment generation & BLEU score calculation in the challenge dataset, please modify line 114 of predict.py, and change default value from False to True. Then, redo steps iii and iv in the last point.
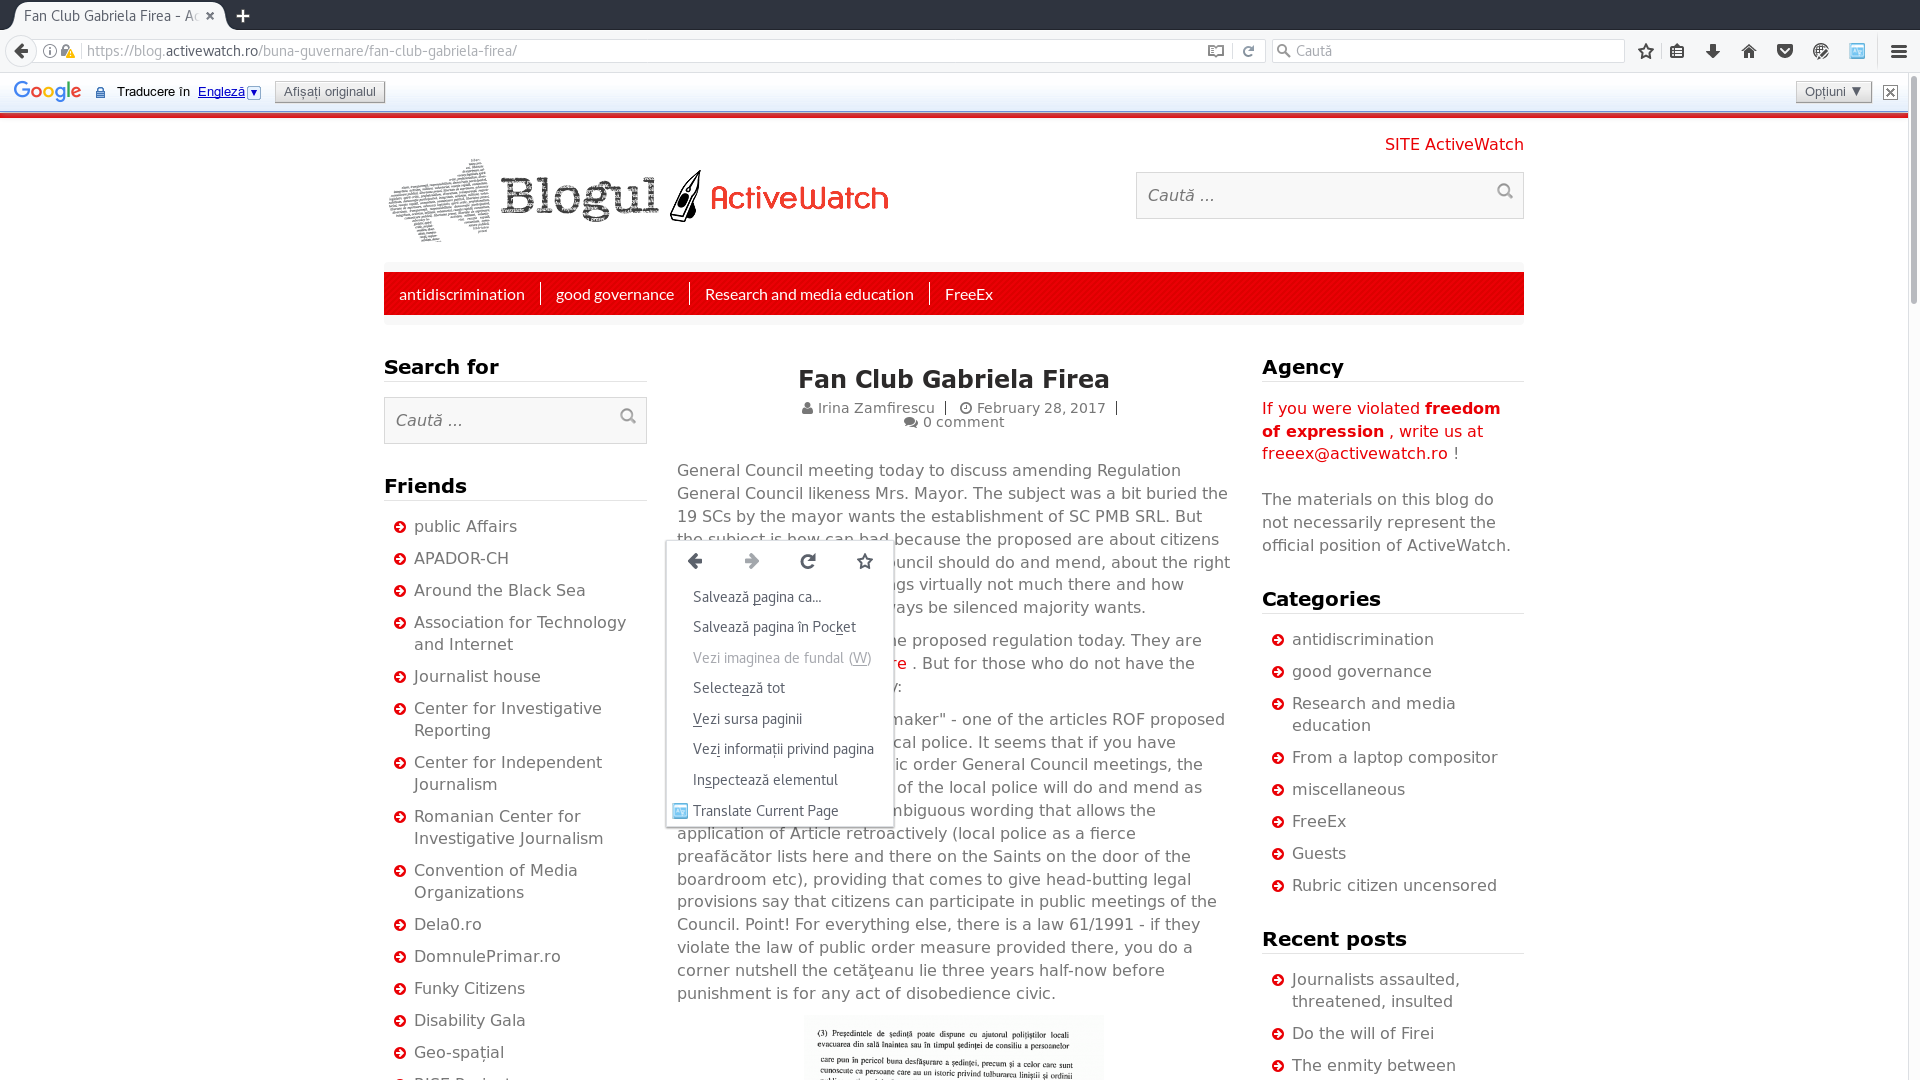
This WebExtension translates the current page with Google Translate. It does so on demand so it does not change the page unless the user selected this.
This extension by default does not transmit any info to any site. ONCE YOU CLICK TRANSLATE CONSIDER THE PAGE SENT TO GOOGLE! Unfortunately this is how Google Translate works. This is the best I could do with the APIs that are avilable. I tried to isolate the page somehow but it is really difficult. Not only this but the extension grabs code from google translate and injects it in your current page. This only happens after you click translate, if you don’t interact with the extension, nothing gets send.
This extension was designed for people leaving Chrome for Firefox. Some really need this feature and don’t mind the downsides. If you want a more privacy frinedly extension, check out AMO it has quite a few of them. Unfortunately they are not as user friendly as this one.