This WebExtension translates the current page with Google Translate. It does so on demand so it does not change the page unless the user selected this.
This extension by default does not transmit any info to any site. ONCE YOU CLICK TRANSLATE CONSIDER THE PAGE SENT TO GOOGLE! Unfortunately this is how Google Translate works. This is the best I could do with the APIs that are avilable. I tried to isolate the page somehow but it is really difficult. Not only this but the extension grabs code from google translate and injects it in your current page. This only happens after you click translate, if you don’t interact with the extension, nothing gets send.
This extension was designed for people leaving Chrome for Firefox. Some really need this feature and don’t mind the downsides. If you want a more privacy frinedly extension, check out AMO it has quite a few of them. Unfortunately they are not as user friendly as this one.
kmbmpdc is a macOS menubar application for controlling music player daemon playback.
Features
Menubar icon indicating playback
Popout window with playback controls and cover art
Media key support
Upcoming track queue
Track search
Playlist support
Stop after current track
Track change notifications with cover art
System requirements
kmbmpdc requires 10.11 or newer.
Installation
Release builds can be found in Github releases. Development builds based on the master branch are uploaded to Meido. All builds are unsigned.
If you are using Homebrew-Cask, you can install the official build with the command:
brew install --cask kmbmpdc
Usage
If you are running MPD on the local machine with the default port and without a password, kmbmpdc should connect automatically to the server on initial start. If this is not the case, you can edit the host, port and password in the application preferences.
Controlling MPD is done via the media keys or by opening the controller from the menubar icon. Media keys support play/pause, next track and previous track. The menubar controller supports the same functions as the media keys plus stop, stop after current track, playlists and different MPD modes.
Track search is opened by clicking on the magnifying glass icon in the controller. The search is performed when the input field on the top of the UI is given a string and Enter is pressed. Individual tracks can be appended at the end of the queue by double-clicking on them. Multiple selections can be added to the beginning or end of the queue by right-clicking the selection and choosing the appropriate action.
Track change notifications are enabled by default. They can be disabled in the preferences. To enable cover art, specify the media library root that is being used by mpd, as the cover art is obtained from the media files themselves.
If you are connecting to a password-protected server, make sure that the client has read and control permissions.
Cover art in notifications
Cover art in notifications currently supports ID3v2 embedded art (ID3v2.3 and ID3v2.4 only) or artwork stored in the same directory as the track in question. In order for the feature to work, media library path must be set in kmbmpdc preferences.
The following priority is used for cover art images:
 cd Frameworks/libmpdclient
 ./autogen.sh --disable-documentation
 make
 cd ../..
Note: if you are using libtool installed with Homebrew, you’ll want to change libtoolize commands in autogen.sh to glibtoolize, since the Homebrew version prepends “g” in front of the tools to prevent conflicts with system tools.
Build imeji
 cd Frameworks/imeji
 make
 cd ../..
Build kmbmpdc
xcodebuild -target kmbmpdc -configuration Release
Code style
SwiftLint is used to enforce code style and conventions.
License
kmbmpdc is licensed under Apache License 2.0. See LICENSE for more details.
libmpdclient is licensed under the revised BSD License. See libmpdclient/COPYING for more details.
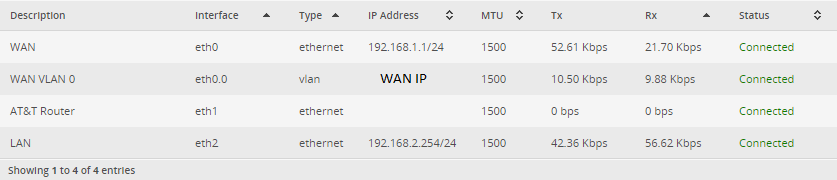
Configuring Edgerouter 10X with EAP Proxy for AT&T Gigabit
This guide was forked from Genghis1227/guide_eap_proxy. I am reworking it as I learn to configure my new EdgeRouter 10X (ER-10X) to replace my EdgeRouter X (ER-X).
This guide configures the EdgeRouter ports with the following:
eth0 = WAN (the connection from the ONT)
eth1 = AT&T Router
eth2 = _Reserving for failover internet_
eth3 = LAN
eth4 = LAN
eth5 = LAN
eth6 = LAN
eth7 = LAN
eth8 = LAN
eth9 = LAN
This process is best completed with a computer that can be connected in the same room as the router. If your computer is in a different room than your ATT router and your EdgeRouter I recommend using a laptop with a network port.
On your AT&T Router
Factory reset your AT&T router (optional)
Record the MAC address of your AT&T router, this is needed in section 4. If using IPv6, record the duid value required.
For IPv6, be sure to change the duid value to the duid of your AT&T router, or wait ~2 weeks for the lease to expire to get a fresh lease.
You can sniff the traffic from your AT&T router to find the duid, or generate one with a script like gen-duid.sh from pfatt on github.

For firewall rules, note that the setup wizard creates rules named WANv6_* if you check the box to enable IPv6, whereas the above rules are WAN6_*.
Disable the WiFi on the AT&T router.
On your EdgeRouter
Perform a factory reset.
Backup and update
Backup config of the EdgeRouter (System > Back Up Config) – Old firmware
Check www.ubnt.com/download to see if there is an updated firmware, download (if desired)
Upgrade firmware of device (if desired) (System > Upgrade System Image)
Backup config of the EdgeRouter (System > Back Up Config) – New firmware
Login to the EdgeRouter EdgeOS by going to https://192.168.1.1 in your browser
1. Basic Setup
Now that you are at a clean slate. Go ahead and log back into your router https://192.168.1.1
Open Putty and connect to 192.168.1.1.
In Putty, type configure then Enter to get into the configure prompt
set interfaces switch switch0 address 192.168.2.254/24
set interfaces switch switch0 description LAN
set interfaces switch switch0 switch-port interface eth3
set interfaces switch switch0 switch-port interface eth4
set interfaces switch switch0 switch-port interface eth4
set interfaces switch switch0 switch-port interface eth5
set interfaces switch switch0 switch-port interface eth6
set interfaces switch switch0 switch-port interface eth7
set interfaces switch switch0 switch-port interface eth8
set interfaces switch switch0 switch-port interface eth9
save;commit
Setup DHCP
set service dhcp-server disabled false
set service dhcp-server hostfile-update enable
set service dhcp-server shared-network-name LAN2
set service dhcp-server shared-network-name LAN2 authoritative enable
set service dhcp-server shared-network-name LAN2 subnet 192.168.2.0/24 default-router 192.168.2.254
set service dhcp-server shared-network-name LAN2 subnet 192.168.2.0/24 dns-server 192.168.2.254
set service dhcp-server shared-network-name LAN2 subnet 192.168.2.0/24 lease 86400
set service dhcp-server shared-network-name LAN2 subnet 192.168.2.0/24 start 192.168.2.5 stop 192.168.2.200
set service dhcp-server static-arp disable
set service dhcp-server use-dnsmasq disable
save;commit
Setup DNS
Change the nameservers to whatever you want.
Cloudflare:
1.1.1.1
1.0.0.1
Google:
8.8.8.8
8.8.4.4
set service dns forwarding cache-size 150
set service dns forwarding listen-on switch0
set service dns forwarding name-server 1.1.1.1
set service dns forwarding name-server 1.0.0.1
set service dns forwarding name-server 8.8.8.8
set service dns forwarding name-server 8.8.4.4
save;commit
Configure router using the below, this will setup the firewall, all interfaces and give you working IPv6
Copy and paste each section below into Putty and run through save and commit. You should be able to see if each section ran properly before continuing.
Setup firewall rules
set firewall all-ping enable
set firewall broadcast-ping disable
set firewall ipv6-name IPv6_WAN_IN default-action drop
set firewall ipv6-name IPv6_WAN_IN description 'WAN to internal'
set firewall ipv6-name IPv6_WAN_IN enable-default-log
set firewall ipv6-name IPv6_WAN_IN rule 10 action accept
set firewall ipv6-name IPv6_WAN_IN rule 10 description 'Allow established/related'
set firewall ipv6-name IPv6_WAN_IN rule 10 state established enable
set firewall ipv6-name IPv6_WAN_IN rule 10 state related enable
set firewall ipv6-name IPv6_WAN_IN rule 20 action drop
set firewall ipv6-name IPv6_WAN_IN rule 20 description 'Drop invalid state'
set firewall ipv6-name IPv6_WAN_IN rule 20 log enable
set firewall ipv6-name IPv6_WAN_IN rule 20 state invalid enable
set firewall ipv6-name IPv6_WAN_IN rule 30 action accept
set firewall ipv6-name IPv6_WAN_IN rule 30 description 'Allow ICMPv6 destination-unreachable'
set firewall ipv6-name IPv6_WAN_IN rule 30 icmpv6 type destination-unreachable
set firewall ipv6-name IPv6_WAN_IN rule 30 protocol icmpv6
save;commit
set firewall ipv6-name IPv6_WAN_IN rule 31 action accept
set firewall ipv6-name IPv6_WAN_IN rule 31 description 'Allow ICMPv6 packet-too-big'
set firewall ipv6-name IPv6_WAN_IN rule 31 icmpv6 type packet-too-big
set firewall ipv6-name IPv6_WAN_IN rule 31 protocol icmpv6
set firewall ipv6-name IPv6_WAN_IN rule 32 action accept
set firewall ipv6-name IPv6_WAN_IN rule 32 description 'Allow ICMPv6 time-exceeded'
set firewall ipv6-name IPv6_WAN_IN rule 32 icmpv6 type time-exceeded
set firewall ipv6-name IPv6_WAN_IN rule 32 protocol icmpv6
set firewall ipv6-name IPv6_WAN_IN rule 33 action accept
set firewall ipv6-name IPv6_WAN_IN rule 33 description 'Allow ICMPv6 parameter-problem'
set firewall ipv6-name IPv6_WAN_IN rule 33 icmpv6 type parameter-problem
set firewall ipv6-name IPv6_WAN_IN rule 33 protocol icmpv6
set firewall ipv6-name IPv6_WAN_IN rule 34 action accept
set firewall ipv6-name IPv6_WAN_IN rule 34 description 'Allow ICMPv6 echo-request'
set firewall ipv6-name IPv6_WAN_IN rule 34 icmpv6 type echo-request
set firewall ipv6-name IPv6_WAN_IN rule 34 limit burst 1
set firewall ipv6-name IPv6_WAN_IN rule 34 limit rate 600/minute
set firewall ipv6-name IPv6_WAN_IN rule 34 protocol icmpv6
set firewall ipv6-name IPv6_WAN_IN rule 35 action accept
set firewall ipv6-name IPv6_WAN_IN rule 35 description 'Allow ICMPv6 echo-reply'
set firewall ipv6-name IPv6_WAN_IN rule 35 icmpv6 type echo-reply
set firewall ipv6-name IPv6_WAN_IN rule 35 limit burst 1
set firewall ipv6-name IPv6_WAN_IN rule 35 limit rate 600/minute
set firewall ipv6-name IPv6_WAN_IN rule 35 protocol icmpv6
save;commit
set firewall ipv6-name IPv6_WAN_LOCAL default-action drop
set firewall ipv6-name IPv6_WAN_LOCAL description 'WAN to router'
set firewall ipv6-name IPv6_WAN_LOCAL enable-default-log
set firewall ipv6-name IPv6_WAN_LOCAL rule 10 action accept
set firewall ipv6-name IPv6_WAN_LOCAL rule 10 description 'Allow established/related'
set firewall ipv6-name IPv6_WAN_LOCAL rule 10 state established enable
set firewall ipv6-name IPv6_WAN_LOCAL rule 10 state related enable
set firewall ipv6-name IPv6_WAN_LOCAL rule 20 action drop
set firewall ipv6-name IPv6_WAN_LOCAL rule 20 description 'Drop invalid state'
set firewall ipv6-name IPv6_WAN_LOCAL rule 20 state invalid enable
set firewall ipv6-name IPv6_WAN_LOCAL rule 30 action accept
set firewall ipv6-name IPv6_WAN_LOCAL rule 30 description 'Allow ICMPv6 destination-unreachable'
set firewall ipv6-name IPv6_WAN_LOCAL rule 30 icmpv6 type destination-unreachable
set firewall ipv6-name IPv6_WAN_LOCAL rule 30 protocol icmpv6
set firewall ipv6-name IPv6_WAN_LOCAL rule 31 action accept
set firewall ipv6-name IPv6_WAN_LOCAL rule 31 description 'Allow ICMPv6 packet-too-big'
set firewall ipv6-name IPv6_WAN_LOCAL rule 31 icmpv6 type packet-too-big
set firewall ipv6-name IPv6_WAN_LOCAL rule 31 protocol icmpv6
save;commit
set firewall ipv6-name IPv6_WAN_LOCAL rule 32 action accept
set firewall ipv6-name IPv6_WAN_LOCAL rule 32 description 'Allow ICMPv6 time-exceeded'
set firewall ipv6-name IPv6_WAN_LOCAL rule 32 icmpv6 type time-exceeded
set firewall ipv6-name IPv6_WAN_LOCAL rule 32 protocol icmpv6
set firewall ipv6-name IPv6_WAN_LOCAL rule 33 action accept
set firewall ipv6-name IPv6_WAN_LOCAL rule 33 description 'Allow ICMPv6 parameter-problem'
set firewall ipv6-name IPv6_WAN_LOCAL rule 33 icmpv6 type parameter-problem
set firewall ipv6-name IPv6_WAN_LOCAL rule 33 protocol icmpv6
set firewall ipv6-name IPv6_WAN_LOCAL rule 34 action accept
set firewall ipv6-name IPv6_WAN_LOCAL rule 34 description 'Allow ICMPv6 echo-request'
set firewall ipv6-name IPv6_WAN_LOCAL rule 34 icmpv6 type echo-request
set firewall ipv6-name IPv6_WAN_LOCAL rule 34 limit burst 5
set firewall ipv6-name IPv6_WAN_LOCAL rule 34 limit rate 5/second
set firewall ipv6-name IPv6_WAN_LOCAL rule 34 protocol icmpv6
save;commit
set firewall ipv6-name IPv6_WAN_LOCAL rule 35 action accept
set firewall ipv6-name IPv6_WAN_LOCAL rule 35 description 'Allow ICMPv6 echo-reply'
set firewall ipv6-name IPv6_WAN_LOCAL rule 35 icmpv6 type echo-reply
set firewall ipv6-name IPv6_WAN_LOCAL rule 35 limit burst 5
set firewall ipv6-name IPv6_WAN_LOCAL rule 35 limit rate 5/second
set firewall ipv6-name IPv6_WAN_LOCAL rule 35 protocol icmpv6
set firewall ipv6-name IPv6_WAN_LOCAL rule 36 action accept
set firewall ipv6-name IPv6_WAN_LOCAL rule 36 description 'Allow ICMPv6 Router Advertisement'
set firewall ipv6-name IPv6_WAN_LOCAL rule 36 icmpv6 type router-advertisement
set firewall ipv6-name IPv6_WAN_LOCAL rule 36 protocol icmpv6
set firewall ipv6-name IPv6_WAN_LOCAL rule 37 action accept
set firewall ipv6-name IPv6_WAN_LOCAL rule 37 description 'Allow ICMPv6 Neighbor Solicitation'
set firewall ipv6-name IPv6_WAN_LOCAL rule 37 icmpv6 type neighbor-solicitation
set firewall ipv6-name IPv6_WAN_LOCAL rule 37 protocol icmpv6
set firewall ipv6-name IPv6_WAN_LOCAL rule 38 action accept
set firewall ipv6-name IPv6_WAN_LOCAL rule 38 description 'Allow ICMPv6 Neighbor Advertisement'
set firewall ipv6-name IPv6_WAN_LOCAL rule 38 icmpv6 type neighbor-advertisement
set firewall ipv6-name IPv6_WAN_LOCAL rule 38 protocol icmpv6
save;commit
set firewall ipv6-name IPv6_WAN_LOCAL rule 50 action accept
set firewall ipv6-name IPv6_WAN_LOCAL rule 50 description 'Allow DHCPv6'
set firewall ipv6-name IPv6_WAN_LOCAL rule 50 destination port 546
set firewall ipv6-name IPv6_WAN_LOCAL rule 50 protocol udp
set firewall ipv6-name IPv6_WAN_LOCAL rule 50 source port 547
save;commit
set firewall ipv6-receive-redirects disable
set firewall ipv6-src-route disable
set firewall ip-src-route disable
set firewall log-martians enable
save;commit
set firewall name WAN_IN default-action drop
set firewall name WAN_IN description 'WAN to internal'
set firewall name WAN_IN rule 10 action accept
set firewall name WAN_IN rule 10 description 'Allow established/related'
set firewall name WAN_IN rule 10 state established enable
set firewall name WAN_IN rule 10 state related enable
set firewall name WAN_IN rule 20 action drop
set firewall name WAN_IN rule 20 description 'Drop invalid state'
set firewall name WAN_IN rule 20 state invalid enable
save;commit
set firewall name WAN_LOCAL default-action drop
set firewall name WAN_LOCAL description 'WAN to router'
set firewall name WAN_LOCAL rule 10 action accept
set firewall name WAN_LOCAL rule 10 description 'Allow established/related'
set firewall name WAN_LOCAL rule 10 state established enable
set firewall name WAN_LOCAL rule 10 state related enable
set firewall name WAN_LOCAL rule 50 action drop
set firewall name WAN_LOCAL rule 50 description 'Drop invalid state'
set firewall name WAN_LOCAL rule 50 state invalid enable
save;commit
set firewall receive-redirects disable
set firewall send-redirects enable
set firewall source-validation disable
set firewall syn-cookies enable
save;commit
5. Finish Bypass Setup
set interfaces ethernet eth0 description WAN
set interfaces ethernet eth0 duplex auto
set interfaces ethernet eth0 firewall in ipv6-name IPv6_WAN_IN
set interfaces ethernet eth0 firewall in name WAN_IN
set interfaces ethernet eth0 firewall local ipv6-name IPv6_WAN_LOCAL
set interfaces ethernet eth0 firewall local name WAN_LOCAL
set interfaces ethernet eth0 speed auto
save;commit
⚠ Before you continue: Edits are required for the next step
Replace aa:bb:cc:dd:ee:ff in this section of the configuration to reflect the mac address of your AT&T Router
set interfaces ethernet eth0 vif 0 address dhcp
set interfaces ethernet eth0 vif 0 description 'WAN VLAN 0'
set interfaces ethernet eth0 vif 0 dhcp-options default-route update
set interfaces ethernet eth0 vif 0 dhcp-options default-route-distance 210
set interfaces ethernet eth0 vif 0 dhcp-options name-server update
set interfaces ethernet eth0 vif 0 firewall in ipv6-name IPv6_WAN_IN
set interfaces ethernet eth0 vif 0 firewall in name WAN_IN
set interfaces ethernet eth0 vif 0 firewall local ipv6-name IPv6_WAN_LOCAL
set interfaces ethernet eth0 vif 0 firewall local name WAN_LOCAL
set interfaces ethernet eth0 vif 0 mac 'aa:bb:cc:dd:ee:ff'
save;commit
set interfaces ethernet eth1 description 'AT&T Router'
set interfaces ethernet eth1 duplex auto
set interfaces ethernet eth1 speed auto
save;commit
set port-forward auto-firewall enable
set port-forward hairpin-nat enable
set port-forward lan-interface switch0
set port-forward wan-interface eth0.0
save;commit
set interfaces ethernet eth0 vif 0 dhcpv6-pd pd 1 interface switch0 ost-address '::1'
set interfaces ethernet eth0 vif 0 dhcpv6-pd pd 1 interface switch0 no-dns
set interfaces ethernet eth0 vif 0 dhcpv6-pd pd 1 interface switch0 refix-id ':0'
set interfaces ethernet eth0 vif 0 dhcpv6-pd pd 1 interface switch0 ervice slaac
set interfaces ethernet eth0 vif 0 dhcpv6-pd pd 1 prefix-length 60
set interfaces ethernet eth0 vif 0 dhcpv6-pd prefix-only
set interfaces ethernet eth0 vif 0 dhcpv6-pd rapid-commit disable
set interfaces ethernet eth0 vif 0 firewall in ipv6-name IPv6_WAN_IN
set interfaces ethernet eth0 vif 0 firewall local ipv6-name IPv6_WAN_LOCAL
set interfaces ethernet eth0 vif 0 ipv6 dup-addr-detect-transmits 1
set system offload ipv6 forwarding enable
set system offload ipv6 vlan enable
save;commit
Setup NAT
set service nat rule 5010 description 'masquerade for WAN'
set service nat rule 5010 outbound-interface eth0.0
set service nat rule 5010 type masquerade
set service nat rule 6000 description 'MASQ all networks NTP to WAN'
set service nat rule 6000 log disable
set service nat rule 6000 outbound-interface switch0
set service nat rule 6000 outside-address port 1024-65535
set service nat rule 6000 protocol udp
set service nat rule 6000 source port 123
set service nat rule 6000 type masquerade
save;commit
If your router supports ipv4 vlan offload use this command:
set system offload ipv4 vlan enable`
save;commit
If not, use this command (ER-X, ER-10X):
set system offload hwnat enable
save;commit
6. Additional Configuration
Configure service gui ports and disable older-ciphers
set service gui http-port 80
set service gui https-port 443
set service gui older-ciphers disable
save;commit
Configure SSH
set service ssh port 22
set service ssh protocol-version v2
set service unms disable
save;commit
Setup UPNP Service
set service upnp
set service upnp2 acl rule 9000 action deny
set service upnp2 acl rule 9000 description 'Deny All'
set service upnp2 acl rule 9000 external-port 0-65535
set service upnp2 acl rule 9000 local-port 0-65535
set service upnp2 acl rule 9000 subnet 0.0.0.0/0
set service upnp2 listen-on switch0
set service upnp2 nat-pmp enable
set service upnp2 secure-mode enable
set service upnp2 wan eth0.0
save;commit
Once everything returns and committed then exit from the configure mode.
Usage: elm-dev [options] [command]


Commands:

  install                  Installs Elm dependencies
  spec                     Runs specs
  docs                     Generates Elm documentation
  help                     Output usage information
  new|init <dir>           Scaffolds a new Elm-UI project
  server|start [options]   Starts development server
  build [options]          Builds final files

Options:

  -h, --help       output usage information
  -V, --version    output the version number
  -e, --env [env]  environment
Questo progetto utilizza Arduino IDE e la board ESP32 Wroom32 per monitorare il movimento continuo tramite un sensore PIR. Quando il movimento viene rilevato per un periodo di almeno 10 secondi, viene generata, firmata e inviata una transazione Bitcoin.
La transazione sfrutta uno script OP_RETURN, che permette di inserire una stringa (ad esempio, “true”) in formato esadecimale all’interno della transazione. È possibile personalizzare la stringa da inviare. Per ulteriori dettagli sul funzionamento dello script OP_RETURN, ti consiglio di approfondire il suo utilizzo nella documentazione di Bitcoin.
Visualizzare board Esp32 su Arduino IDE
Andare su preferenze e nella sezione “Additional board manager URLs” inserire questo: "https://dl.espressif.com/dl/package_esp32_index.json, http://arduino.esp8266.com/stable/package_esp8266com_index.json"
Sulla board manager di Arduino IDE installare “esp32 by Espressif System”.
Potrebbe essere necessario installare un driver per rilevare la board dal sistema operativo:
Sempre su Windows, potrebbe essere necessario scaricare il driver per far rilevare le porte da Windows: CP210x Universal Windows Driver.
All’interno dell’Arduino IDE, se non viene selezionata in automatico, scegli la board “DOIT ESP32 DEVKIT V1”.
Procedure per l’utilizzo del progetto
Registrarsi su BlockCypher e copiare il proprio token nel progetto.
Il progetto richiede due wallet Bitcoin Testnet (non indirizzi SegWit poiché la procedura di firma non li gestisce).
È possibile anche utilizzare un solo wallet mittente e creare una transazione verso una faucet.
Ovviamente, il wallet mittente deve avere asset all’interno. Puoi ricaricare il tuo wallet Bitcoin Testnet tramite il faucet: https://coinfaucet.eu/en/btc-testnet/.
Il progetto utilizza un LED e un sensore Groove PIR.
Si possono modificare i PIN in base alle esigenze.
Il sensore PIR deve essere impostato in modalità N_retrig per monitorare un movimento continuo.
Dipendenze
Per utilizzare questo progetto, è necessario installare la libreria ArduinoJson tramite il Library Manager dell’Arduino IDE:
Arduino IDE > Sketch > Include Library > Manage Libraries
Cerca e installa la libreria ArduinoJson.
Come Usare la Libreria uBitcoin con la Modifica al Network
Questo progetto utilizza una versione modificata della libreria uBitcoin a causa di un conflitto con l’oggetto omonimo Network, presente sia nelle librerie Wifi.h che in uBitcoin.h. Pertanto, è necessario includere correttamente la libreria modificata nell’IDE di Arduino.
Clona o scarica il repository:
Puoi clonare il repository tramite Git o scaricare il file ZIP direttamente dalla pagina del progetto su GitHub.
Apri il progetto con l’IDE di Arduino:
Una volta scaricato o clonato il repository, apri il file .ino nel tuo Arduino IDE.
Aggiungi la libreria uBitcoin modificata:
Vai su Sketch > Include Library > Add .ZIP Library.
Seleziona il file ZIP della libreria uBitcoin dalla cartella del progetto.
Note:
Assicurati di avere le librerie necessarie (come ArduinoJson) correttamente installate prima di iniziare.
In caso di problemi con la libreria uBitcoin, controlla che la versione corretta (modificata) sia stata inclusa.
⚠️ ATTENZIONE ⚠️
Per caricare il codice sull’ESP32, è necessario tenere premuto il pulsante “BOOT” per tutta la durata del caricamento.
DISCLAIMER: the rubidity gem version is different
from the rubidity built into the facet vm / app and i (Gerald Bauer)
am NOT affiliated with facet computing inc. (middlemarch et al) or paid to work on the rubidity gem.
Rubidity & Rubysol – Rubies for Layer 1 (L1) Contracts / Protocols with “Off-Chain” Indexer
This is a rubidity & rubysol sandbox by Gerald Bauer
The idea here is to experiment with rubidity “off-chain”
and if time permits break the “majestic rails rubidity monolith”
also known as “facet vm” (formerly “ethscriptions vm”) up into easier to (re)use modules.
For example, why not bundle up a “core” language “rubidity” gem with
no dependencies on any blockchain and break out “core / standard”
contracts samples and database (SQL) and runtime modules or such.
For an alternate approach that look’s at the “majestic rails rubidity monolith” code as-is (that is, not suggesting new or alternate syntax or semantics)
and simply tries to break out and start to (re)package / modular-ize code in “place holder” gems (waiting for adoption by the founders) such as 0xfacet and 0xfacet-typed and 0xfacet-rubidity see Rubidity O.G. (Dumb Contracts) Public Code Review / (More) Tests / Gems & More »
Aside – Rubidity vs Rubysol – What’s the difference (in a nutshell)?
rubidity-typed – “zero-dependency” 100%-solidity compatible data type machinery incl. (frozen) string, address, uint, int, enum, struct, array, mapping, and more for rubidity – ruby for layer 1 (l1) contracts / protocols with “off-chain” indexer
solidity-typed (formerly known as rubidity-typed) – “zero-dependency” 100%-solidity compatible data type and application binary interface (abi) machinery incl. bool, (frozen) string, address, bytes, uint, int, enum, struct, array, mapping, event, and more for solidity-inspired contract (blockchain) programming languages incl. rubidity, rubysol et al
rubidity (“next”) – ruby for layer 1 (l1) contracts / protocols with “off-chain” indexer
rubysol – (formerly known as rubidity (“next”)) ruby for layer 1 (l1) contracts / protocols with “off-chain” indexer
rubysol-contracts – standard contracts (incl. erc20, erc721, etc) for ruby for layer 1 (l1) with “off-chain” indexer
uniswap – core uniswap v2 (dumb) contracts for ruby (rubysol) for layer 1 (l1) with “off-chain” indexer
punks – 10 000 punks – the facet (dumb) contract edition v1 / v2 (in ruby / rubysol / rubidity)
rubidity-classic – rubidity classic / o.g. contract builder; trying the impossible and square the circle, that is, a rubidity “classic / o.g.” dsl builder generating rubidity “more ruby-ish” contract classes.
rubidity – (formerly known as rubidity classic) rubidity “classic / o.g.” contract builder; trying the impossible and square the circle, that is, a rubidity “classic / o.g.” dsl builder generating rubysol “more ruby-ish” contract classes.
More:
rubidity-simulacrum – run (dumb) blockchain contracts in rubidity (with 100%-solidity compatible data types & abis) on an ethereum simulacrum in your own home for fun & profit (for free)
redpaper – Yes, you can. it’s just ruby. Run the sample contracts from the Red Paper
with rubidity and simulacrum!
soliscript (formerly known as rubidity-simulacrum) – run blockchain contracts in rubysol (with 100%-solidity compatible data types & abis) on an ethereum simulacrum in your own home for fun & profit (for free)
soliscript.starter (formerly known as red paper contracts) – run (blockchain) contracts in rubysol (with 100%-solidity compatible data types & abis) on an ethereum simulacrum in your own home for fun & profit (for free) incl. the red paper contracts e.g. satoshi dice (gambling), crowd funder, ballot (liquid delegate democracy)
rubysol-by-example – Rubysol By Example – an introduction to Rubysol with simple examples (inspired and mostly following Solidity By Example)
learninminutes – Learn X in Y Minutes (Where X=Rubysol, Y=?)
For some ongoing (or historic)
rubidity discussions & comments from
the discord (chat server), see the Changelog – Good Morning.
White Papers
Proof Of Time – “Gas-Less” Decentralized “Turing-Complete” Computing with “Normalized” Timeouts
DRAFT – DRAFT – DRAFT (Version 0.1)
Let’s try to square the circle and solve the halting problem of “turing-complete” computing
with “normalized” timeouts.
The idea:
Every transaction gets time measured / profiled and if a max time is hit the transaction is halted / stopped and marked as invalid / reverted / aborted.
The problem:
(Compute) Time is relative!
Let’s make (transaction processing) time absolute with mathematics / statistics (within a +/- window)…
✅ Post donation messages live to Telegram or Discord channels (/messagesub for Telegram, /discord for Discord). This is also useful if you and some friends run a podcast and all want to see the boostagrams.
✅ Get /balance and /withdraw funds
✅ Debug feed problems by doing /checkfeed RSSURL
✅ Get daily updates by default (can be disabled)
✅ Get a complete export of data by /exporting your payments. You will get an excel file with all payments, withdrawals and more.
✅ Advanced users: Enable /autowithdraw and auto-send earnings >100 sat to your own node. Why not use your own node? To use the nice statistics (upcoming), for easier switching of destinations, if you don’t want to publish your own node key!
🔊 For podcast listeners
Use an app which supports streaming sats to your favorite podcasters.
Mobile: Breez is an excellent non-custodial Lightning wallet
Mobile + Desktop: Sphinx Chat also supports streaming to podcasts
Mobile + Desktop: CurioCaster as a progressive web app
Mobile: Fountain is an excellent podcast app on iOS and Android
🎙 For podcast creators
Two ways of getting sats from your listeners. Join the Support group if you need help!
⚡️ Use this service
Claim your podcast on podcasterwallet. Then click Specify your wallet manually. and SatoshisStream as custom node: 03c457fafbc8b91b462ef0b8f61d4fd96577a4b58c18b50e59621fd0f41a8ae1a4
Install/open Telegram, start a conversation with @SatoshisStreamBot and follow instructions (/claim your feed)
Withdrawal fee is 3% for the service + 1 % to PodcastIndex for a total of 4%
⚡️ DIY: Do it yourself
Set up a Lightning node which supports keysend. RaspiBlitz is an easy FOSS option to set up your own node
Set up channels, make sure you have inbound capacity
How I use Pyenv + Pipenv + Neovim for my daily projects.
Pyenv config
In our project directory, we could make
$ pyenv local 3.7.4
We check with
$ pyenv version
3.7.4 (set by /home/cjadeveloper/.../my-project/.python-version)
Pipenv
Create a new project using Python 3.7.4, specifically
If we open a terminal and write pyenv which python, it will return the full path to
the current python executable
$ pyenv which python
/home/cjadeveloper/.pyenv/versions/3.7.4/bin/python
We If we could use this information
In bash or zsh to do:
$ pipenv --python $(pyenv which python)
Creating a virtualenv for this project…
Pipfile: /home/cjadeveloper/.../my-project/Pipfile
Using /home/cjadeveloper/.pyenv/versions/3.7.4/bin/python (3.7.4) to create virtualenv…
...
In fish:
> pipenv --python (pyenv which python)
Creating a virtualenv for this project…
Pipfile: /home/cjadeveloper/.../my-project/Pipfile
Using /home/cjadeveloper/.pyenv/versions/3.7.4/bin/python (3.7.4) to create virtualenv…
...
Install Neovim Python Packages and fancy interactive superpower terms
Download the config file and save it as ~/.config/nvim/init.vim (use that exact path and name).
Open Neovim with pipenv run nvim . and it will it continue the installation by
itself. Wait for it finish and done!
Then, when Neovim already works, we could activate the venv with pipenv shell --fancy
inside our projects directory and open it with nvim .
Note: The --fancy option is necessary in case we use fish together with some oh-my-fish theme and the prompt breaks. Just as pointed out here
Optional: Pipenvwrapper
Pipenvwrapper is a shell functions
similar to virtualenvwrapper but using Pipenv as backend.
If we use Pipenvwrapper, we could write workon (or useenv depends on how we
configure it) and use a specific virtualenv or list all the available ones if none is
provided. With this we can activate the venv and go directly to the project folder from
wherever we are.
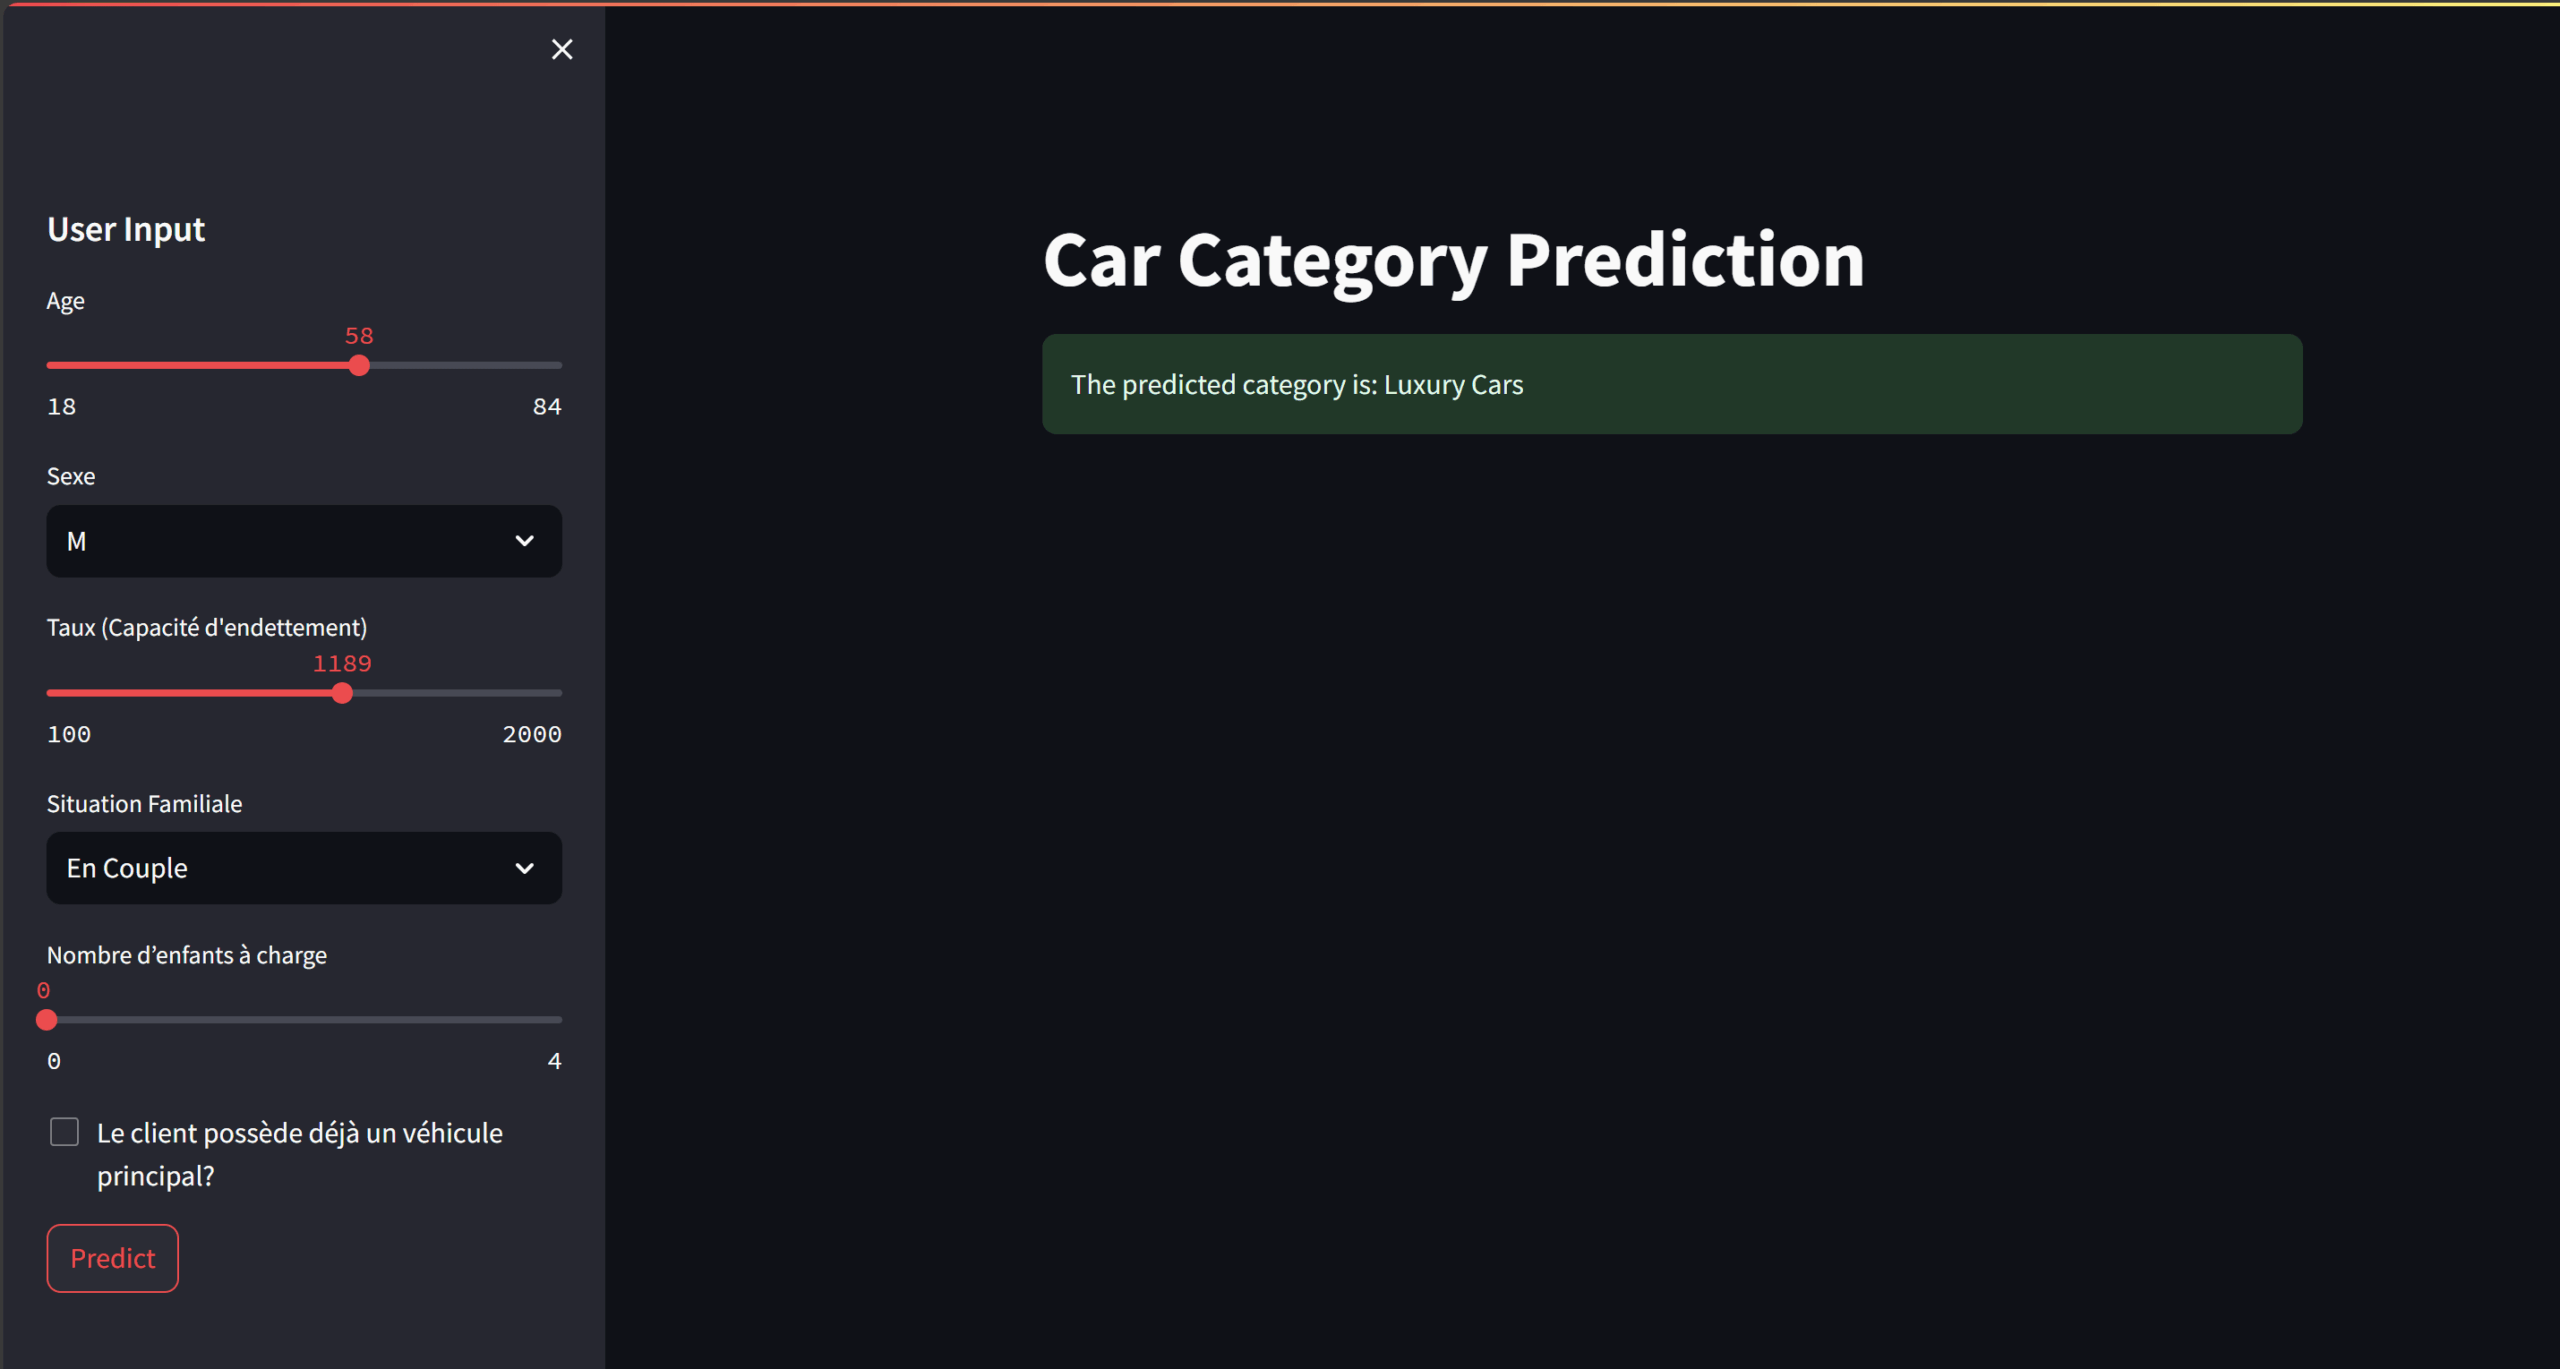
This repository contains the code and documentation for an automotive dealership data mining project aimed at enhancing customer experience and sales strategies. The project leverages various datasets, including vehicle catalogues, customer transactions, registrations, and marketing data, to extract valuable insights and provide personalized recommendations.
Project Objectives
Categorize vehicles into distinct segments based on customer preferences.
Empower the sales team to recommend vehicles tailored to individual customer needs.
Enhance strategic decision-making for the dealership through data-driven insights.
Repository Structure
DataMining_Project.ipynb: Jupyter notebooks containing data exploration, preprocessing, modeling, and analysis.
app.py: Application Interface with Streamlit.
README.md: Documentation providing an overview of the project, its objectives, and repository structure.
Getting Started
Clone this repository to your local machine.
Run the Jupyter notebooks to explore the data analysis, preprocess data and train models.
Use the provided source code in the app.py to make predictions and use the interface.
Refer to the documentation in the notebooks and source code for detailed explanations of each step.


 https://github.com/andreicristianpetcu/google_translate_this