Blog

  • microservices-observability

    Build Status codecov.io GitHub license Join the chat at https://gitter.im/xmlking/microservices-observability

    microservices-observability

    As Developers are migrating from Monolithic architecture to distributed microservices and Service Mesh, troubleshooting production issues become difficult.

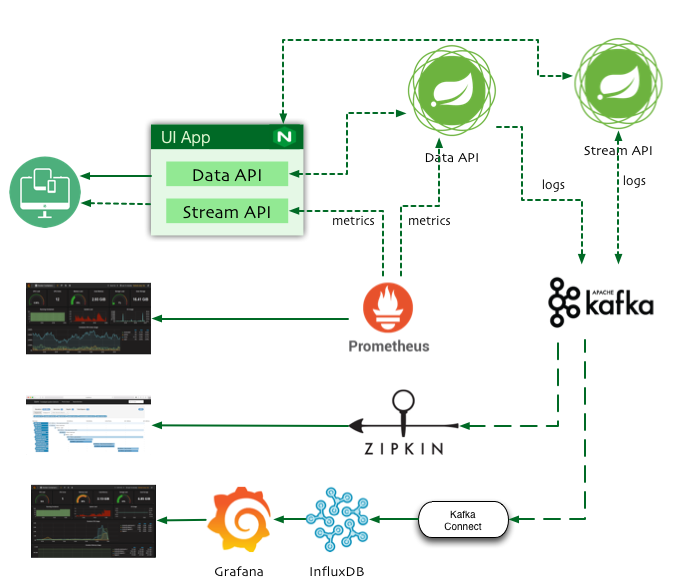
    This sample application showcases patterns to implement better Observability at web scale.

    Reactive

    Log Aggregation

    Reactive

    Highlights

    • Ready to go docker configuration for set up GILK logging stack in a minutes.
      • GILKGrafana , InfluxDB, Logstash json format, Kafka
    • Monitoring solution for docker hosts and containers with Prometheus, Grafana, cAdvisor, NodeExporter and alerting with AlertManager.
    • Vendor-neutral instrumentation
    • end-to-end Functional Reactive Programming (FRP) with Spring 5.
    • Multi-project builds with Gradle Kotlin Script.
    • Spring Kotlin Support
    • Docker deployment

    Prerequisites

    1. Gradle 4.4 (Install via sdkman)
    2. Docker for Mac Setup Instructions

    Build

    # build all 3 executable jars
    gradle build
    # continuous build with `-t`. 
    # this shoud be started before any run tasks i.e., `gradle ui-app:bootRun`, for spring's devtools to work.
    gradle build -x test -t
    # build all 3 apps
    gradle build -x test
    # build all 3 docker images
    gradle docker -x test

    Test

    gradle test

    Run

    Manual
    # start infra services
    docker-compose  -f docker-compose-infra.yml up cassandra
    docker-compose  -f docker-compose-infra.yml up kafka
    docker-compose  -f docker-compose-infra.yml up influxdb

    Start all 4 apps with gradle xyz:bootRun : cassandra-data-service, stream-service, ui-app , kafka-influxdb-service

    If you want to debug the app, add –debug-jvm parameter to Gradle command line

    Docker

    You can also build Docker images and run all via Docker Compose

    # start containers in the background
    docker-compose up -d
    # start containers in the foreground
    docker-compose up 
    # show runnning containers 
    docker-compose ps
    # scaling containers and load balancing
    docker-compose scale stream=2
    # 1. stop the running containers using
    docker-compose stop
    # 2. remove the stopped containers using
    docker-compose rm -f
    # just start only infra services
    docker-compose  -f docker-compose-infra.yml up
    # connect(ssh) to a service and run a command
    docker-compose exec cassandra cqlsh
    # see logs of a service 
    docker-compose logs -f stream
    # restart single service
    docker-compose restart stream
    # start single service
    docker-compose -f docker-compose-infra.yml up cassandra
    docker-compose -f docker-compose-infra.yml up kafka
    docker-compose -f docker-compose-infra.yml up influxdb
    # check health for a service
    docker inspect --format "{{json .State.Health.Status }}" microservicesobservability_app_1
    docker ps
    docker-compose -f docker-compose-fluentd.yml up

    Access UI App at http://localhost:8080

    Prometheus http://localhost:9090/graph

    InfluxDB http://localhost:8083

    Grafana http://localhost:1634

    Gradle Commands

    # upgrade project gradle version
    gradle wrapper --gradle-version 4.4.1 --distribution-type all
    # gradle daemon status 
    gradle --status
    gradle --stop
    # refresh dependencies
    gradle build -x test --refresh-dependencies 

    Reference

    Visit original content creator repository https://github.com/xmlking/microservices-observability
  • C-Experiments

    C-Experiments

    Experiments on C Exploits

    Environment

    • 64 bit Linux Systems

    Completed Challenges

    – Dynamic (c)

    • Loads string compare function on runtime
    • Self modifies strlen comparison value
    • Hides string using bit addition

    – Load (cpp)

    • Loads compiled library file on runtime
    • Loads string compare function from loaded library
    • Hides string using XOR from templates

    – Rewrite (cc)

    • Spawns/Clones secondary process for self modification
    • Secondary process modifies the heap from /proc/{pid}/mem of primary process
    • Hides string using bit addition

    – Corrupt (asm)

    • Collapsed ELF header with precompiled statically linked _start function
    • Uses truncated input as key, for decoding of flag
    • Anti-debugging from corrupted header and invalid executable entry point e_entry

    – Reboot (c)

    • Logistic differential equation to “predict” randomized canary values
    • 34 byte overflow vulnerable shellcode array stored as reboot shellcode
    • Buffer overflow for canary, egghunter shellcode and XOR exploit decoding

    Extras

    – Screwed (c)

    • Corrupts ELF 64-bit or 32-bit headers with 0xffff values for e_shoff, e_shnum and e_shstrndx
    • Binary is still able to be run normally, but crashes when debugged

    – Prochollow (c)

    • Proof of work for Linux process hollowing
    • Spawns/Clones secondary process for self modification
    • Secondary process modifies the main function from /proc/{pid}/mem of primary process

    – psHide (c)

    • Searches process name using directory and pid
    • Forces ps aux to skip process by process name, thus hiding from process list

    Methodology

    – Self Modification

    1. MPROTECT and editing of value using C address pointer

      > objdump -d dynamic

      Objdump

      Calculate address of value to overwrite, eg.

      void *add = (void*)ch;
      unsigned char *ins = (unsigned char*)add + 84;
      *ins = 0x24;

      0x14 is overwritten as 0x24

      if (strlen(sr)==20) => if (strlen(sr)==36)
    2. Fork processes and editing of value within /proc/{pid}/mem

      Primary process pipes its information (pid, address and length of string to overwrite) to secondary process

      int pipe1[2];
      int pipe2[2];
      int pipe3[2];
      pid_t f = fork();
      if (f == 0) {
          close(pipe1[1]);
          close(pipe2[1]);
          close(pipe3[1]);
      
          read(pipe1[0], addr_buf, 100);
          read(pipe2[0], length_buf, 100);
          read(pipe3[0], pid_buf, 100);
          // ...
      } else {
          close(pipe1[0]);
          close(pipe2[0]);
          close(pipe3[0]);
      
          // Calculate address, length of string and pid of process
      
          sprintf(addr_buf, "%lx", addr);
          sprintf(length_buf, "%lu", length);
          sprintf(pid_buf, "%d", pid);
      
          write(pipe1[1], addr_buf, strlen(addr_buf)+1);
          close(pipe1[1]);
          write(pipe2[1], length_buf, strlen(length_buf)+1);
          close(pipe2[1]);
          write(pipe3[1], pid_buf, strlen(pid_buf)+1);
          close(pipe3[1]);
          //...
      }

      Secondary process to use pid to read /proc/{pid}/mem and overwrite string at given address and length

      strncpy(buf, new_string, *length_given);
      lseek(mem_file, *address, SEEK_SET);
      if (write(mem_file, buf, *length_given) == -1) {
          puts("Incorrect");
          return 1;
      }

      Temporary string s is overwritten with flag (First string s != Second string s)

      printf("\nThe flag is \"%s\"!\n", s);
      puts("\nValidating......");
      sleep(1);
      if (!strcmp(s, inp)) {
          puts("Correct");
      } else {
          puts("Incorrect");
      }

    – Dynamically loaded functions

    1. Load function from struct function list

      // Struct to load function
      typedef struct functions{
          const char *function_name;
          TW address;
      } functions;
      
      // List of dynamic functions
      functions function_struct[] = {
          {"string_compare", &sc},
          {NULL, NULL}
      };
      
      // Compare called_function with function list, then load and run matched function
      int call_func(const char *called_function, const char* key, long* flag, long* buffer, char* input)
      {
          int k;
          for(k=0; function_struct[k].function_name != NULL; ++k){
              if(strcmp(called_function, function_struct[k].function_name) == 0){
                  return function_struct[k].address(key, flag, buffer, input);
              }
          }
          return -1;
      }

      Calling “string_compare” on call_func() will compare with function list in function_struct, then is loaded and run when matched

      (One function is stored within the struct for simplicity)

    2. Load function from self-created library

      // Pipe for loaded function
      struct S {
          string input, flag;
          int output;
      };
      
      static const auto library = "\
          #include<stdlib.h>\n\
          #include<string>\n\
          struct S {std::string a,b;int i;};\n\
          extern \"C\" void F(S &s) {\n\
              if ((s.input.length()==0||\
              s.flag.length()==0)||\
              s.input.compare(s.flag)!=0||\
              s.input.length()!=s.flag.length())\
              {\n\
                  s.output=1;\n\
                  return;\n\
              }\n\
              s.output=0;}\n\
          ";
      create(library) // Create library using gcc
      
      void * function_library = load() // Load library
      if ( function_library ) {
          // Load function F from created library
          int ( *func ) ( S & ) = (int (*)( S & )) dlsym ( function_library, "F" );
      }

      Create its own library with hidden function on runtime, such that loaded function will not be shown during decompilation

    – Corrupted header

    1. Collapse header via assembly

      Corrupted header

      Entrypoint of executable is fit into the Magic bytes in the ELF header, on top of the collapsed headers

      Entrypoint gives problems to static debuggers and disassemblers from disassembling the full binary

      Radare2 and other dynamic disassemblers are able to ignore the ELF header and follow the jump instruction after the entrypoint, thus able to disassemble much more of the executable

    2. Corrupt ELF headers, i.e. e_shoff, e_shnum and e_shstrndx

      static Elf64_Ehdr* header;
      
      header->e_shoff = 0xffff;
      header->e_shnum = 0xffff;
      header->e_shstrndx = 0xffff;

      Disassembler reads ELF binary with overflow, preventing static debuggers and disassemblers from working

      Values can be also be changed to 0x0 for the opposite effect, where the disassembler is unable to read the full binary

    Visit original content creator repository https://github.com/mcdulltii/C-Experiments
  • Drone-navigation-and-obstacle-avoidance-using-DDPG

    Drone Obstacle Avoidance with AirSim and DDPG

    Authors

    • Nishant Pandey
    • Jayasuriya Suresh

    Overview

    This project implements a drone obstacle avoidance system using AirSim and the Deep Deterministic Policy Gradient (DDPG) algorithm. The goal is to train a drone to navigate through an environment while avoiding obstacles in real-time.

    Pacakges Used

    • stable-baselines3 v1.7.0 (pip install stable-baselines3[extra]==1.7.0)
    • airsim v1.8.1
    • gym 0.21.0
    • Packages as required by the airsim package.
      A requirements.txt has been attached in case of versions mismatches or the conda env fails to be imported.

    Features

    • Utilizes the AirSim simulator for realistic drone flight dynamics and sensor data.
    • Implements the DDPG algorithm for training the drone to avoid obstacles.
    • Provides a user-friendly interface for visualizing the obstacle avoidance behavior.

    Contents

    There are three folders, lidar, depth , lidar+depth which have train.py, eval.py and drone_env.py. The instructions to run all have been documented below.
    Other folders and files are :

    • readme.md
    • env.yml
    • requirements.txt
    • setting.json

    Installation

    1. Unzip the folder if you have not done so

    2. Install the required packages from the env.yml file using conda

      conda env create -f env.yml
    3. Download and setup the AirSim simulator by following the instructions in the AirSim documentation.
      For this project we used the biniaries provided by airsim under releases , V1.8.1 , AirsimNH.zip.Extract the zip and run the airsimnh.exe for the simulator to work. Also paste the provided config file under Documents/Airsim/settings.json

    Usage

    1. Launch the AirSim simulator.

    2. Navigate to Lidar/Lidar+depth folder, run the main script to start the drone obstacle avoidance system:

      python train.py
    3. The drone will start training. Once training is over, it will be saved under /models of the root dir. Logs are saved under /tmp of the root dir which can be viewed using

    tensorboard --logdir=/tmp/name_of_folder

    Evaluation

    1. Launch the AirSim simulator.

    2. Modify the model_path in the eval.py file to the path of your model. Run the main script to start the drone obstacle avoidance system:

      python  eval.py
    3. Evaluation starts and you can see the output in the airsim window. After evaluation is done, we can see the metrics which show up in a matplotlib window and also is saved in the root directory.

    Bugs

    • If the code does not connect to the simulator, please change the port in settings.json under ApiServerPort as well as on the code , in the files drone_env_ddpg.py and ddpg_lidar.py in line number 19 for both eval and the normal files.

    Acknowledgements

    Visit original content creator repository
    https://github.com/nishantpandey4/Drone-navigation-and-obstacle-avoidance-using-DDPG

  • Similar-Document-Image-Retrieval-Dataset

    Similar-Document-Image-Retrieval-Dataset

    The benchmark collection named Similar-Document-Image-Retrieval-Dataset(SDIRD) is provided for a task, which is finding out the similar document images for a query document image. The structure of SDIRD is as follows:

    ├── database
    ├── databaseClassified
    ├── queryset
    ├── trainingset
    └── database-subject
    
    database

    This is the document image database with 10240 document images.

    databaseClassified

    This directory collects the images of above database according to corresponding original source(148 papers).

    queryset

    This is the query image dataset with 1000 images totally.

    trainingset

    This is the target dataset to fine-tune pre-trained CNN models, which including training set with 1000 document images and validation set with 200 images, and the label or category information.

    database-subject

    This is the information of document image database about the category id, category label, the number of images from corresponding paper and title.

    performance

    Methods Top-1(%) Top-3(%) Top-5(%) Top-10(%)
    GoogLeNet 8.3 13.8 17.3 21.6
    ResNet-152 17.2 24.7 28.6 35.2
    AlexNet 32.6 45.0 51.6 59.6
    Fine-tuned-AlexNet 37.5 54.1 60.9 69.8
    VGGNet-D 22.8 34.0 39.3 46.9
    Fine-tuned-VGGNet-D 37.2 56.2 64.6 76.5
    VGGNet-E 24.1 37.5 44.1 53.2
    Fine-tuned-VGGNet-E 46.8 68.9 79.3 90.0
    Ours 54.1 82.9 97.3 100.0
    Ours 58.8 86.4 94.5 98.9


    Visit original content creator repository
    https://github.com/YuanSiping/Similar-Document-Image-Retrieval-Dataset

  • mcp-github

    GitHub MCP 工具

    ISC License Node.js TypeScript

    English Version (README-EN.md)

    这是什么

    这是一个基于 MCP (Model Context Protocol) 的 GitHub 工具,它能让 AI 模型通过标准化接口访问 GitHub API。

    简单来说,它让 AI 助手能够执行各种 GitHub 操作,如创建仓库、提交代码、管理分支等,无需用户手动输入复杂的 API 调用。

    支持的功能 (点击展开)
    • 仓库管理:创建、获取、列表、更新、删除
    • 分支操作:创建、获取、列表、删除
    • Pull Request 管理:创建、获取、列表、更新、合并
    • Issue 管理:创建、获取、列表、更新、关闭
    • 用户相关操作:查看关注、互动统计
    • 代码管理:文件内容、提交记录
    功能演示 (点击展开)

    以下是 GitHub MCP 工具的一些核心功能演示:

    仓库创建演示

    仓库创建演示

    分支操作演示

    分支操作演示

    Pull Request 管理演示

    Pull Request 管理演示

    Issue 跟踪演示

    Issue 跟踪演示

    通过简单的自然语言指令,AI 可以帮助你完成上述所有操作,无需手动编写 API 调用或在浏览器中操作 GitHub 界面。

    快速上手

    0. 环境准备

    环境要求 (点击展开)
    1. Python 3.11+(必需)

      • 访问 Python 官网
      • 下载并安装 Python 3.11 或更高版本
      • 重要:安装时请勾选”Add Python to PATH”选项
      • 安装完成后请重启电脑,确保环境变量生效
    2. Node.js 和 npm

      • 访问 Node.js 官网
      • 下载并安装 LTS(长期支持)版本
      • 安装时选择默认选项即可,安装包会同时安装 Node.js 和 npm
    3. Git

      • 访问 Git 官网
      • 下载并安装 Git
      • 安装时使用默认选项即可

    1. 克隆并安装

    git clone https://github.com/shuakami/mcp-github.git
    cd mcp-github
    npm install
    npm run build

    ⚠️ 重要提示:安装后请不要删除克隆或解压的文件,插件需要持续访问这些文件!

    2. 构建项目

    npm run build

    3. 配置 GitHub Token

    如何获取 GitHub 个人访问令牌 (点击展开)
    1. 访问 GitHub 的个人访问令牌设置页面:https://github.com/settings/tokens
    2. 点击 “Generate new token” → “Generate new token (classic)”
    3. 输入令牌描述,例如 “MCP GitHub Tool”
    4. 在权限选择中,至少勾选以下权限:
      • repo (完整访问权限)
      • user (用户信息)
    5. 点击页面底部的 “Generate token” 按钮
    6. 非常重要:生成后立即复制令牌,因为你之后将无法再次查看它

    根据你的操作系统,按照以下步骤配置 MCP:

    Windows 配置 (点击展开)
    1. 在 Cursor 中,打开或创建 MCP 配置文件:C:\Users\你的用户名\.cursor\mcp.json

      • 注意:请将 你的用户名 替换为你的 Windows 用户名(即你的电脑账户名称)
    2. 添加或修改配置如下:

    {
      "mcpServers": {
        "github-mcp": {
          "command": "pythonw",
          "args": [
            "你的安装路径/mcp-github/bridging_github_mcp.py"
          ],
          "env": {
            "GITHUB_TOKEN": "你的GitHub令牌"
          }
        }
      }
    }

    ⚠️ 请注意:

    • 你的安装路径 替换为你克隆或解压项目的实际路径(例如:C:/Users/John/mcp-github/...
    • 使用正斜杠(/)而非反斜杠(\)来表示路径
    • 你的GitHub令牌 替换为你在上一步中获取的实际令牌
    macOS 配置 (点击展开)
    1. 在 Cursor 中,打开或创建 MCP 配置文件:/Users/你的用户名/.cursor/mcp.json

      • 注意:请将 你的用户名 替换为你的 macOS 用户名
    2. 添加或修改配置如下:

    {
      "mcpServers": {
        "github-mcp": {
          "command": "python3",
          "args": [
            "/Users/你的用户名/mcp-github/bridging_github_mcp.py"
          ],
          "env": {
            "GITHUB_TOKEN": "你的GitHub令牌"
          }
        }
      }
    }

    ⚠️ 请注意:

    • 你的用户名 替换为你的 macOS 用户名(例如:/Users/johndoe/mcp-github/...
    • 你的GitHub令牌 替换为你在上一步中获取的实际令牌
    • 确保路径正确指向你的项目目录
    Linux 配置 (点击展开)
    1. 在 Cursor 中,打开或创建 MCP 配置文件:/home/你的用户名/.cursor/mcp.json

      • 注意:请将 你的用户名 替换为你的 Linux 用户名
    2. 添加或修改配置如下:

    {
      "mcpServers": {
        "github-mcp": {
          "command": "python3",
          "args": [
            "/home/你的用户名/mcp-github/bridging_github_mcp.py"
          ],
          "env": {
            "GITHUB_TOKEN": "你的GitHub令牌"
          }
        }
      }
    }

    ⚠️ 请注意:

    • 你的用户名 替换为你的 Linux 用户名(例如:/home/user/mcp-github/...
    • 你的GitHub令牌 替换为你在上一步中获取的实际令牌
    • 确保路径正确指向你的项目目录

    4. 启动服务

    配置好之后你的 Cursor 编辑器会自动启动 MCP 服务。然后你就可以开始用了。

    示例交互 (点击展开)

    你可以要求 AI 执行以下操作:

    • “创建一个名为 test-project 的私有仓库”
    • “列出我的所有仓库”
    • “在 my-repo 仓库创建一个 PR,从 feature 分支到 main 分支”
    • “获取 my-repo 中的 README.md 文件内容”

    工作原理

    技术实现细节 (点击展开)

    本工具基于 MCP (Model Context Protocol) 标准实现,作为 AI 模型与 GitHub API 之间的桥梁。它使用 octokit.js 作为底层 GitHub API 客户端,并通过 Zod 进行请求验证和类型检查。

    每个 GitHub 操作都被封装为标准化的 MCP 工具,接收结构化参数并返回格式化结果。响应数据经过智能处理,自动去除冗余信息,提取关键内容,并转换为人类可读格式

    这种方法使 AI 模型能够轻松理解 GitHub API 返回的复杂数据结构,并以更自然的方式与用户进行交互。

    许可证

    ISC

    Visit original content creator repository https://github.com/shuakami/mcp-github
  • Sozai

    Sozai

    UI framework with vuetify-like material components built with Svelte

    scuffed logo

    Usage

    I made the library to be as easy to setup as possible. No preprocessors for css or js are required.

    First, we install sozai with npm

    npm i sozai
    

    Then, we surround the main component with <SozaiApp />

    <!-- App.svelte --> <script> import { SozaiApp } from 'sozai'; </script> <SozaiApp> <!-- Put your app in here! --> </SozaiApp>

    And boom, we’ve set up a sozai app. No need to mess around with the bundler to correctly setup purgecss or postcss!

    Testimonies

    "sozai gud" - Kento Nishi

    @KentoNishi (named as one of the top 300 scholars in the 81st Regeneron Science Talent Search—the nation’s oldest and most prestigious science and mathematics competition for high school seniors)

    "sozai is what happens when ui frameworks actually work" - Anish

    @anish-lakkapragada (made an ml library when he was 14 although not with sozai)

    Motivation

    I mainly have worked on LiveTL which upon rewriting in svelte a year ago, has used a svelte material ui framework. Our journey took the following steps.

    1. We find svelte-material-ui as the most popular material toolkit for svelte around the time v2 was in beta. I struggled to set it up and after a day of messing with bundler configs, gave up 😢
    2. We find svelte-materialify and start to use it as it initially required no setup. It is also, in our opinion, the best-looking svelte material toolkit. However to use the full library, we needed to setup css preprocessors which was annoying but doable.
    3. A few months after we successfully rewrite LiveTL using svelte-materialify, we realize that svelte-materialify is buggy af and bugs out on conditional renders and randomly started flickering.
    4. A few months later, we plan to integrate with another project which adds the requirement that the bundle size be small for LiveTL. Unfortunately, svelte-materialify does not tree-shake and produces massive bundles.
    5. We swap out the svelte-materialify components with smelte and immediately see a drop in bundle size. However, the build time has increased due to needing to use purgecss in order to not end up with megabytes long css files. Months later, one of the other three core LiveTL devs and I are fed up with tailwind (smelte forces you to add tailwind to your app). In addition, smelte seems to be unmaintained.
    6. I say fck it, I’m making my own toolkit.

    Comparison

    Everything has pros and cons, let’s compare sozai to the other svelte material design frameworks.

    Framework Pros Cons Verdict
    sozai
    • Developed along with development of https://taskaru.app (will be open sourced soon) so it is tested in production
    • Easy to setup
    • I made it
    • Slider is buggy on safari ios
    • Can only use material icon font
    • I made it
    Use this in small/nonimportant apps
    svelte-material-ui
    • Actively maintained
    • Sveltekit support
    • Very stable
    • Accessible
    • Supports both mdicons and material icon font
    • Uses the official material design css
    • IMO doesn’t look the absolute best
    • Ripple effect is not very nice
    • May still be hard to setup (haven’t tried recent v6 yet)
    Use this if you have a serious app.
    smelte
    • Works well
    • First-class tailwind support
    • Looks the ugliest of svelte’s material framework (although still looks decent)
    • Unmaintained
    • First-class tailwind support
    Use this if you enjoy the pain that is tailwind but be prepared to write wrappers around smelte components.
    svelte-materialify
    • Components look very nice
    • Looks a lot like vuetify
    • Buggy
    • Unmaintained
    • Doesn’t tree-shake
    Don’t use at all.

    Credits

    Sozai’s ripple is based off of svelte-materialify’s ripple (we changed it to activate on touch events and fixed some bugs with it). Sozai also makes extensive use of svelte-material-ui’s event forwarding mechanism which forwards all events dom elements emit. Sozai was initially meant to be smelte without tailwind and due to this, sozai’s button and dialog are more or less smelte’s but de-tailwinded.

    Visit original content creator repository https://github.com/r2dev2/sozai